SQL Window Functions – Lead and Lag

The LEAD and LAG window functions in SQL offer the simple yet powerful ability to analyze data beyond the current row. They allow you to access values from rows before and after the current one, without using complex self-joins or subqueries. You can use these two functions to compare values across rows, calculate differences, and perform other operations that require looking ahead or behind in your dataset.

Back when I used Microsoft Access as my main data tool and needed to access information from a previous row to do calculations, I would use VBA coding to implement solutions. At the time, it did not occur to me that I could achieve similar functionality using SQL Server’s LEAD and LAG window functions.

In this highly informative video (if I do say so myself, I’m biased but I’m correct), I show you a use case for the LAG function to calculate the average time for an invoice to move through approver workflow steps. At a high level, this entails subtracting the approval date from a prior row from the current row’s approval date.

LEAD & LAG Window Function Syntax

The LAG window function allows you to access data from a prior row to “look back” dynamically as you query data. This aids calculating deltas, running totals, and more. The syntax of LAG function is as follows:

LAG(column_name, offset, default) OVER (PARTITION BY column_name ORDER BY column_name)

The LEAD window function allows you to access data from an upcoming row to “look ahead” dynamically as you query data. The syntax of LEAD function is as follows:

LAG(column_name, offset, default) OVER (PARTITION BY column_name ORDER BY column_name)

The PARTITION BY clause is key; it that ensures we only look back (or ahead) within a given value in the column_name (for example as shown in the video, an invoice number) otherwise row transitions would provide invalid lookups.

Why Use Lead and Lag functions in SQL?

Using LEAD and LAG functions in SQL can help you analyze your data faster and easier, because you can:

  • Perform calculations and comparisons across rows without using self-joins or subqueries, which can be complex and slow.
  • Avoid exporting your data to Excel or other tools, which can be time-consuming and error-prone.
  • Simplify your code and improve its readability and maintainability.

As I mentioned earlier, if I had known about these two functions years ago when I was trying to access prior values via VBA and loops, I could have saved myself a lot of time, increased my efficiency and made my approach much easier to read in the resulting documentation.

Conclusion

I believe that learning from examples is critical for mastering both logical concepts and SQL syntax. By watching the linked video, you will gain the knowledge to tackle similar problems in your own data analysis scenarios.

Additionally, LEAD and LAG provide simpler, set-based solutions for cross-row data comparisons that would otherwise require procedural coding.

LEAD and LAG functions allow you to merge the past and the future!

I appreciate everyone who has supported this blog and my YouTube channel via merch. Please check out the logo shop here.

If you want to learn all the latest tips and tricks in core data analysis tools, stay in contact with me through my various social media presences.

Thank you!!

Anthony B Smoak

Learn GROUP BY vs PARTITION BY in SQL

TLDR

If you are using SQL, you will eventually come across the GROUP BY and PARTITION BY clauses. While the Group BY clause is fairly standard in SQL, most people do not understand when to use the PARTITION BY clause. This easy to understand video uses some NBA season data to make the point very clear! I will show you the best use case of when to apply PARTITION BY.

Bonus content begins at the 10:03 mark, where I demonstrate a use case for the fundamentals I teach you earlier in the video.

The reviews are in, make sure to watch the whole video!

GROUP BY EXAMPLE

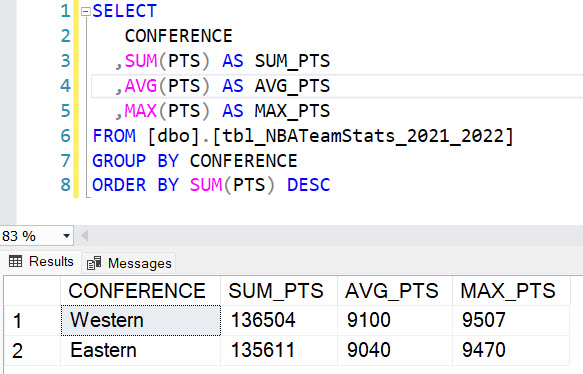
To begin, I demonstrate how to use GROUP BY in SQL Server Express to understand basic NBA team statistics based strictly upon the conference. I have to tell the database what to GROUP BY to generate all of the aggregate statistics. I select the conference and want to generate the aggregate sum of points, average points, and max points. I also order the results by the sum of points in a descending fashion.

When I run the query, the results show how the data points have been grouped by conference. The results show the sum of points by the two values in the conference field (Western and Eastern), the average points, and the max points. I can also see that there are no individual rows in this result, which is expected when using the GROUP BY clause with aggregate functions like MIN, MAX, SUM, and COUNT.

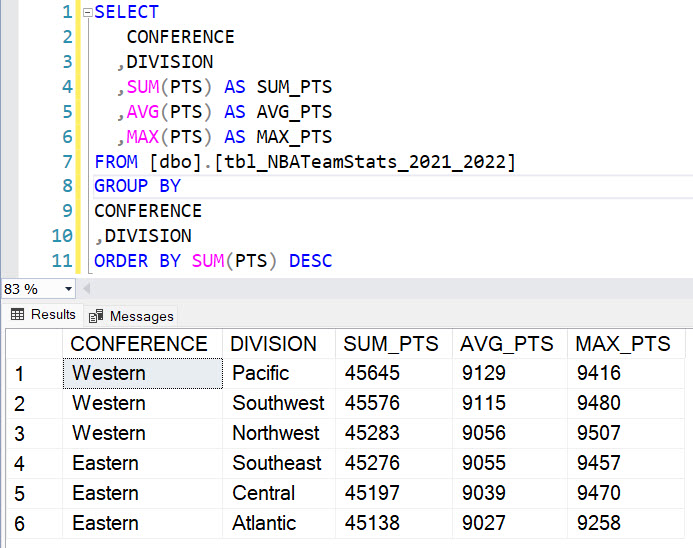
If I want to further break down the results and throw in a division, I need to also select the division field and add it to the GROUP BY statement as well. This action further slices the data points into specific conference and divisions that the teams play in.

PARTITION BY

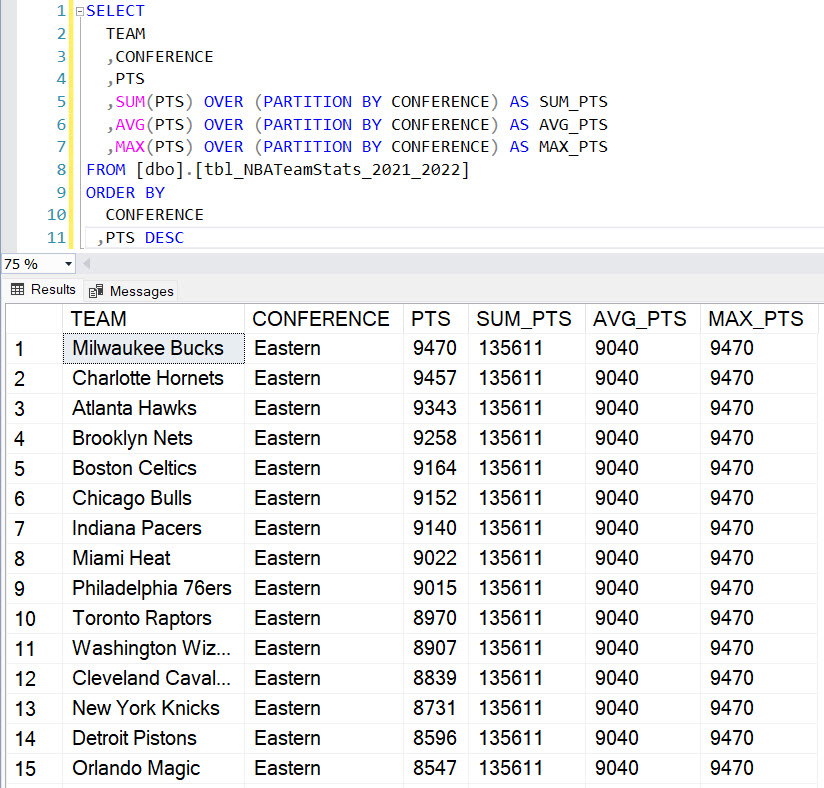
Now, let’s talk about the OVER and PARTITION BY sub-clause. In this next example, I select the conference and bring in the points, which is our measure. Just like with GROUP BY, I sum the points, but I add “OVER” and the sub-clause “PARTITION BY.” This is where the magic happens because I tell SQL what data point to Partition by (i.e., conference) to show the total sum of points by conference.

When I run the query, the results show the sum of points by conference, and I can order the results by individual team points in descending order . The results show a breakdown of the sum of points by conference, but there are still individual rows in the results.

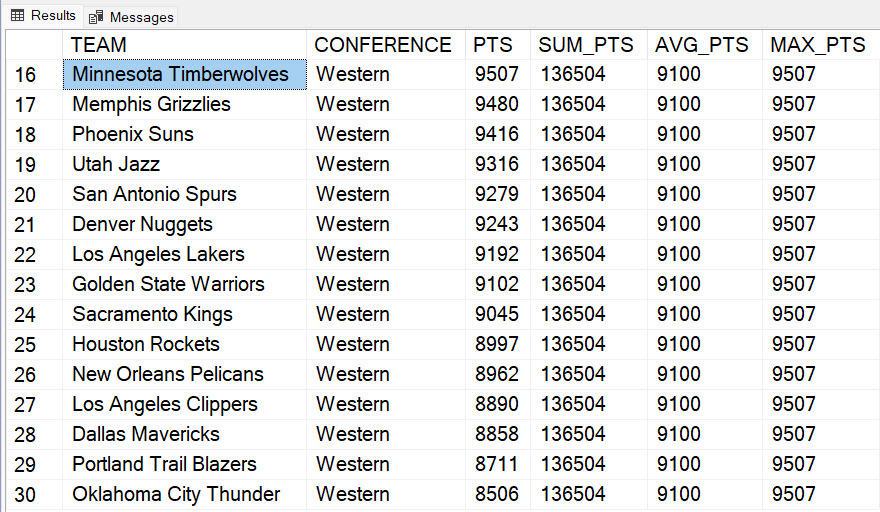
Here is a continuation of the same results for the Western conference teams:

This is an important distinction!! By using OVER and PARTITION BY, I can have data at the most granular level (unaggregated points at an individual team level i.e., the PTS field) combined with data at a higher granularity (points summed, averaged and the maximum points scored at an overall conference level).

The higher granularity of the data at the conference level makes the values for the last three statistics columns repeat (i.e., 135611 for SUM_PTS, 9040 for AVG_PTS and 9470 for MAX_PTS in the Eastern Conference). Similar data is returned for the Western conference.

I’m essentially allowed to have my data cake and eat it too with this best of both worlds approach!

IN SUMMARY

The GROUP BY statement is used to group rows that have the same values in a specific column or set of columns. When used with aggregate functions such as SUM, AVG, MAX, MIN, COUNT, etc., the GROUP BY statement allows us to calculate summary statistics for each group. The result will yield one row for each group. Typically, a GROUP BY statement will reduce the number of rows returned by your SQL.

On the other hand, the PARTITION BY statement is used to divide the data into partitions or subsets based on a specific column or set of columns (like conference in our case). Unlike GROUP BY, PARTITION BY does not reduce the number of rows returned in the result set. Instead, it adds a new column that shows the result of the aggregate function (e.g., SUM, AVG, MAX, etc.) for each partition.

LET PAT BEV COOK

So remember, when it comes to GROUP BY and PARTITION BY in SQL, just like how the Minnesota Timberwolves balanced an effective array of shots to lead the league in total points scored, understanding the nuances of when to use each statement can make all the difference in winning that crucial play-in game against your data! Yes you have to watch the video to understand this reference.

Also, I’m not bad at Pat Bev for going over the top, as this win was against a former employer who recently traded him. Success is always the best revenge!!

Happy querying!!

I appreciate everyone who has supported this blog and my YouTube channel via merch. Please check out the logo shop here.

Stay in contact with me through my various social media presences.

Thank you!!

Anthony B Smoak

Use Excel to Connect to SQL Server Data

TLDR

Connect directly to SQL Server data from within Excel. Also learn how to add and modify SQL statements from within Excel and pass them to SQL Server for data retrieval. If you need to quickly refresh data from SQL Server without hassle, then you need to watch this video!!

Intro

As a data professional, I am always looking for ways to optimize my workflow and increase efficiency. One of the techniques that I have found particularly helpful is making a direct connection between Excel and SQL Server. In this video, I will show you how to set up this direct connection and explain the benefits of using it.

What is a Direct Connection Between SQL and Excel?

First of all, let me explain what I mean by a direct connection between these two tools. Typically, when working with data in Excel, you would export the data from SQL Server into a .csv file and then import that file into Excel. This process can be time-consuming and cumbersome, especially if you are working with large datasets. With a direct connection, you can access the data in SQL Server directly from Excel, without the need for any intermediate steps.

What Do I Demonstrate in the Video?

To demonstrate this in the video, I walk you through an example. I am using the Wide World Importers DW sample database from Microsoft, which you can easily import into SQL Server. Within this database, I am looking at the fact.order table, which has over 230,000 rows and many columns. In Excel, I start with a blank sheet and navigate to the Data ribbon. From there, I select “From Database” and then “From SQL Server Database.”

This prompts me to enter a server name and a database name. If you have access to SQL Server, you can find the server name by connecting to the database engine. Otherwise, you may need to reach out to your database administrator to obtain this information (always stay on your DBA’s good side, if you know what’s good for you). Once you enter the server and database names, you can hit “OK” and Excel will work its magic to establish a connection.

At this point, you can preview the data from the table that you want to import. Excel will give you the option to transform the data if necessary, but we’ll just hit “Load.” Excel will then create a connection and query the SQL Server database and load the data directly into Excel. This means that you can always access the most up-to-date version of the data, without having to worry about exporting and importing files!!

Advantages of Connecting SQL and Excel

Now, let’s say that you need to update the data in Excel at a later time. Perhaps you have some ad hoc processes that reference this data and you need to ensure that you always have the latest version. With a direct connection, this is easy to do. You can simply go to the Data ribbon and select “Refresh.” Excel will connect to SQL Server and update the data in your Excel sheet with the latest data from the database.

This is incredibly powerful because it means that you can share your Excel sheet with others without worrying about whether they have the latest version of the data. As long as they have access to the SQL Server database, they will always see the most up-to-date version of the data when they open the Excel sheet.

One thing to keep in mind is that this type of direct connection is best suited for ad hoc purposes!! In other words, you should not use this to create production worksheets that will be used by others. This is because the direct connection is dependent on having access to the SQL Server database. If that access is lost, the Excel sheet will no longer be able to connect to the database and the data will be lost. Therefore, it is best to use this type of connection for temporary analysis and reporting purposes.

Once you have successfully set up the direct connection between Excel and SQL Server, you can easily refresh the data whenever you need it. To refresh the data, all you have to do is go to the Data tab, and click on the “Refresh All” button. This will refresh all the data connections in your workbook, including the connection to SQL Server.

Powerful Excel Functionality (PivotTables and Pivot Charts)

I don’t reference this in the video, but you can also use Excel’s PivotTables and PivotCharts to analyze and visualize the data. PivotTables allow you to group and summarize data in many different ways, while PivotCharts provide a visual representation of the data that is easy to understand. It may be easier for you to manipulate this data in Excel and extract additional insights than in SQL Server.

Financial analysts, in particular, should avoid taking manual inputs from any and everywhere (especially ungoverned data sources) and using this type of refresh for production purposes. As a recovering financial analyst I know your management hates automation and loves when you cut and paste random information from Bob in division finance. I also know they want to see you work 12 hours a day because the CFO needs that monthly IT spend variance to budget!! Please do yourself a favor and meditate hard for serenity every Sunday night.

Conclusion

In conclusion, using a direct connection between Excel and SQL Server can greatly improve your workflow when working with large datasets. By leveraging the full power of SQL Server’s querying capabilities and Excel’s Pivot tools, you can create powerful AD-HOC reports and analyze data in ways that would be difficult or impossible with other tools. Consider setting up a direct connection to SQL Server to streamline your ad-hoc workflow and improve your productivity.

Additional References to Maximize Your Learning

All views and opinions are solely my own and do not necessarily reflect those of my employer

I appreciate everyone who has supported this blog and my YouTube channel via merch. Please check out the logo shop here.

Thank you!!

Anthony B Smoak

P.S. I respect your hustle Financial Analysts. I ask that you respect those who want to make your life easier with report automation!!

Build Dynamic SQL with SQL Server and Excel

In this video you will learn how to use the SQL CASE statement to add “filter flexibility” to your front-end Excel worksheet, thus taking your SQL + Excel skills to the next level. I’ll reveal the UPDATED code I used to build a dynamic SQL statement using SQL Server and Excel.

By using Excel as a tool to pass cell values to SQL Server queries, you’ll be able to generate dynamic SQL statements on the fly, saving time and reducing the risk of errors in your code. Building upon the previous video “Call a SQL Server Stored Procedure using Excel Parameters”, let’s enhance your SQL skills and streamline your workflow.

Here is a screenshot of the front end Excel worksheet we setup in previous videos. This Excel sheet will execute a stored procedure call with parameters supplied from cells on the sheet.

Below is the stored procedure I use to enhance the code from previous videos. I setup a static SQL string that will serve as the base of the SQL statement. I then use the CASE statement to evaluate the cell values incoming from the Excel worksheet (with some slight manipulation for empty and default date values incoming from Excel).

Depending upon those values, the filter clause is dynamically built and appended to the base of the SQL string, which is then executed with the sp_executedqsl command. This command has many advantages with respect to protecting your code from a SQL injection attack.

If you need a breakdown of the code and the worksheet functionality, make sure to watch the video below.

Additional References to Maximize Your Learning

I always have fun creating this type of content and sharing with you, my YouTube channel followers.

Stay in contact with me through my various social media presences.

All views and opinions are solely my own and do not necessarily reflect those of my employer

I appreciate everyone who has supported this blog and my YouTube channel via merch. Please check out the logo shop here.

Thank you!!

Anthony B Smoak

Passing Parameter Values from Excel to SQL Server

If you’re working with data in Excel and need to connect to a SQL Server database, there are a couple of ways to pass parameter values from Excel to SQL Server. In my first video, “Passing Parameter Values from Excel to SQL Server,” I show you how to connect to SQL Server and read values from a cell and pass those values to a native SQL query without using parameters.

Advantage: The first approach has the advantage of being quick and easy to implement. This is because it does not require any additional setup or configuration, such as creating stored procedures in SQL Server. Instead, the values are passed directly to the query, which can be executed immediately.

However, this approach can also be prone to SQL injection attacks, where a hacker inputs malicious SQL code into an input field in order to gain unauthorized access to the database.

Verdict: Speed over Security. Good for Ad-Hoc personal use.

In my second video, “Call a SQL Server Stored Procedure using Excel Parameters,” I demonstrate how to connect to SQL Server from Excel and pass cell values from Excel to SQL Server using a stored procedure. This approach is more secure because the values are passed to a stored procedure rather than a query. It simply requires the setup of a stored procedure in SQL Server, and I show you two ways to accomplish this feat.

Advantage: Stored procedures provide an added layer of security because they can be set to execute with specific permissions, and can be audited for changes and usage. This makes it harder for an attacker to gain unauthorized access to the database or to execute malicious SQL commands.

However, the potential small disadvantage of this approach is that the stored procedures will need to be updated and managed separately from the Excel file.

If you’re new to working with SQL Server and Excel, I recommend watching both videos. The first video will give you a good overview of the basics, while the second video will show you a more secure way to pass parameter values.

I always have fun creating this type of content and sharing with you, my YouTube channel followers.

You can also follow my dapper data adventures on Instagram.

All views and opinions are solely my own and do not necessarily reflect those of my employer

I appreciate everyone who has supported this blog and my YouTube channel via merch. Please check out the logo shop here.

Thank you!!

Anthony B Smoak

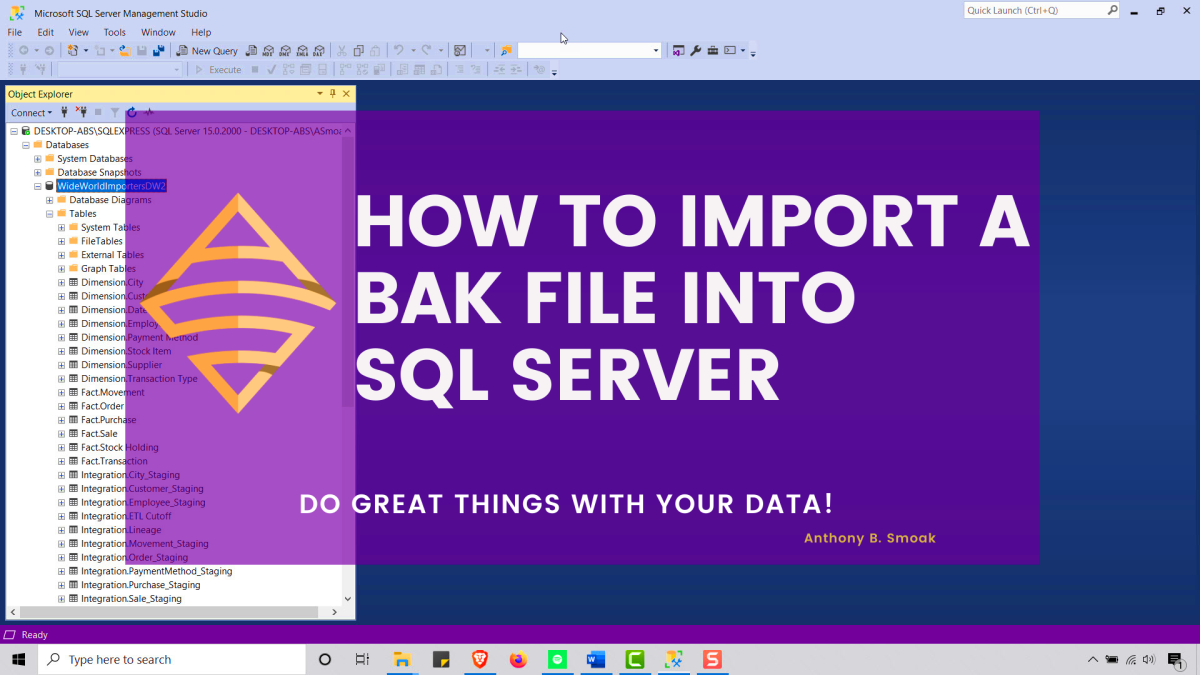
How to Import a BAK File into SQL Server

If you’ve ever asked “How do I import a .BAK file into SQL Server” or “What is a BAK file and how do I open it” then this is your video. Additionally, I also demonstrate how to create a .BAK file to backup your database. If you work with data then you need to know this tip!

Do Great Things with Your Data

Anthony B. Smoak

Please like and subscribe on the Anthony B. Smoak YouTube channel!
Definitely pick up some merch if you’ve enjoyed this blog and YouTube channel over the years.

All views and opinions are solely my own and do not necessarily reflect those of my employer.

Free SQL Data Profiling Tool: Idera SQL Data Profiler

In this tip I will provide an overview of a completely free data profiling tool (at least as of the time of this post) that is easy to use if you are in the Microsoft database stack. You can download the IDERA SQL Profiling tool and immediately put it to work to perform basic column profiling and analyses. The tool will display a summary of the data contained in a selected table and each of its columns. 

Use this tool on the following systems:

  • Microsoft SQL Server: 2008 R2, 2012, 2014, 2016; 2017 Windows & Linux (provisional); Express, Standard, Enterprise editions
  • Microsoft Azure SQL Database
  • Amazon Relational Database Service (RDS)

IDERA SQL Data Profiler has some minor quirks but you can’t beat the price. Check out my review in the video above.

Just remember that data profiling should always be done initially before you start analyzing a new dataset or designing a new visualization. Always start with the basics.

If you find this type of instruction valuable make sure to subscribe to my Youtube channel.

T-SQL Tips and Quick Reference

Whenever I have to fire up SQL Server to perform some analyses there are a few functions, keywords and capabilities that I always find myself referring to in order to analyze my data. As is the case with most T-SQL users, even those of us that have been using T-SQL for over a decade, in our heads we always know what we want to do but will refer to our favorite syntax reference sources in order to progress. I decided to make a handy reference sheet for myself and then decided to post it here for anyone else.

How to Create a Temporary Table in T-SQL / SQL Server

Temporary (i.e., temp) tables enable the storage of result sets from SQL scripts yet require less record locking overhead and thus increase performance. They remain in effect until they are explicitly dropped, or until the connection that created them is discontinued.

As I see it, their main benefit is that they preclude me from writing difficult to comprehend nested queries since I can place a result set inside a temp table and then join it back to a normal table at-will.

In this example, the results of permanent table ‘TABLE1’ will be placed into global temporary table ##TEMPTABLE:

SELECT 
     FIELDNAME1,
     FIELDNAME2,
     FILEDNAME3 
INTO ##TEMPTABLE 
FROM TABLE1

Temp tables are stored in the tempdb system database.

TempDB

“The tempdb system database is a global resource that is available to all users connected to the instance of SQL Server or connected to SQL Database.”

Additional Reference:

What do the Hashtags Mean in T-SQL Temp Table Creation?

 The number of hash signs “#” preceding the name of the temp table affects whether the scope of the table is local or global.

  • If you precede the temp table name with “#”, then the table will be treated as a local temp table.
  • If you precede the temp table with “##”, then the table will be treated as a global temp table.

“You can create local and global temporary tables. Local temporary tables are visible only in the current session, and global temporary tables are visible to all sessions. Temporary tables cannot be partitioned. Prefix local temporary table names with single number sign (#table_name), and prefix global temporary table names with a double number sign (##table_name).”

Additional References:


How to Drop a Temp Table
in T-SQL / SQL Server

 There are times when you will need to rerun code that creates a temp table. If the temp table has already been created, you will encounter an error.

“There is already an object named ‘##TEMP_TABLE_NAME’ in the database.”

Place the following code above the creation of your temp tables to force SQL Server to drop the temp table if it already exists. Change ##TEMP_TABLE_NAME to your table name and use the correct number of hashtags as applicable to a local (#) or global (##) temp table.

IF OBJECT_ID('tempdb..##TEMP_TABLE_NAME') IS NOT NULL
DROP TABLE ##TEMP_TABLE_NAME

How to Add a New Field to a Temp Table in T-SQL / SQL Server (ALTER TABLE)

Here is example T-SQL that illustrates how to add a new field to a global temp table. The code below adds a simple bit field (holds either 1 or 0) named FIELD1 to the temp table, declares it as NOT NULL (i.e., it must have a value) and then defaults the value to 0.

ALTER TABLE ##TEMP_TABLE
ADD FIELD1 Bit NOT NULL DEFAULT (0)

The following code changes the data type of an existing field in a global temp table. FIELD1 has its data type changed to NVARCHAR(2) and is declared as NOT NULL.

ALTER TABLE ##TEMP_TABLE
ALTER COLUMN FIELD1 NVARCHAR(20) NOT NULL;

Additional References:


How to Use a CASE Statement in T-SQL / SQL Server

The following information on the CASE statement is direct from Microsoft:

The CASE expression evaluates a list of conditions and returns one of multiple possible result expressions. The CASE expression has two formats:

  • The simple CASE expression compares an expression to a set of simple expressions to determine the result.
  • The searched CASE expression evaluates a set of Boolean expressions to determine the result.

Both formats support an optional ELSE argument.

CASE can be used in any statement or clause that allows a valid expression. For example, you can use CASE in statements such as SELECT, UPDATE, DELETE and SET, and in clauses such as select_list, IN, WHERE, ORDER BY, and HAVING.

Examples from Microsoft:

SELECT
ProductNumber,
Category =
CASE ProductLine
WHEN 'R' THEN 'Road'
WHEN 'M' THEN 'Mountain'
WHEN 'T' THEN 'Touring'
WHEN 'S' THEN 'Other sale items'
ELSE 'Not for sale'
 END,
Name
FROM Production.Product
ORDER BY ProductNumber;


SELECT
ProductNumber,
Name,
"Price Range" =
CASE
WHEN ListPrice =  0 THEN 'Mfg item - not for resale'
WHEN ListPrice = 50 and ListPrice = 250 and ListPrice < 1000 THEN 'Under $1000'
ELSE 'Over $1000'
END
FROM Production.Product
ORDER BY ProductNumber ;

Here is a link to great post that highlights some of the unexpected results when using the CASE statement.


How to Use the Cast Function in T-SQL / SQL Server

When you need to convert a data field or expression to another data type then the cast function can be helpful. I typically have the need to take imported text fields and evaluate them as a datetime. The cast statement below helps me resolve this issue.

Select cast(txtOrder_Date as datetime) as Order_Date

This statement can also be used in a WHERE clause to filter the text as if it were a true datetime field/.

Where cast(txtOrder_Date as datetime)) between '20170101' and '20181231'

Furthermore, you can cast a literal string to an integer or decimal as needed.

Select cast(‘12345’ as int) as Integer_Field
Select cast(‘12345.12’’ as decimal (9,2)) as Decimal_Field

When your FIELDNAME is a text value, you can use the cast function to change its data type to an integer or decimal, and then sum the results. Here are a few examples I have had to use in the past with the sum function.

sum(cast(FIELDNAME as int)) as Sum_Overall_Qty

sum(cast(ltrim(rtrim(FIELDNAME2)) as decimal(38,2))) as Sum_Sales_Price

Additional Reference:


Using the REPLACE Function in T-SQL / SQL Server

The Replace function is useful when you need to replace all occurrences of one character or substring with another character or substring. The following select will replace the string ‘Anthony’ with ‘Tony’.

Select REPLACE(‘My name is Anthony’, ‘Anthony’, ‘Tony’);

REPLACE Function

Additional Reference:


How to Convert a Negative Text Number in Parenthesis Format to a Numeric Data Type (T-SQL / SQL Server)

I’ve found this particular expression useful when trying to convert a negative number in text format to a decimal value when the text is enclosed in parentheses; i.e., changing (123.45) to -123.45

It makes use of the REPLACE function to find the leading parenthesis and replace it with a negative sign. This first REPLACE is nested inside another REPLACE function in order to find the trailing parenthesis and replace

Select cast(replace(replace('(123.45)','(','-'),')','') as money);

REPLACE function2

You can also use the convert function to accomplish the same result. Below I used this line of code to sum the negative formatted text (represented by FIELD_NAME) by converting it to the money data type after replacing the parenthesis.

sum(convert(money,replace(replace(FIELD_NAME,'(','-'),')',''))) as Sum_Domestic_Price


COALESCE Function in T-SQL / SQL Server

The COALESCE function is very useful when replacing NULL field values with a substitute value. Per Microsoft, the COALESCE function evaluates in order a comma delimited list of expressions and returns the current value of the first expression that initially does not evaluate to NULL.

For example,

SELECT COALESCE(NULL, NULL, 'third_value', 'fourth_value');

returns the third value because the third value is the first value that is not null. I will use the COALESCE function at times to replace NULL values with 0 for use in calculations.

Select COALESCE(NULL_FIELD, 0)

https://docs.microsoft.com/en-us/sql/t-sql/language-elements/coalesce-transact-sql?view=sql-server-2017

How to Dynamically Pivot Data in SQL Server


SQL is the lifeblood of any data professional. If you can’t leverage SQL and you work with data, your life will be more difficult than it needs to be.

In this video I am using SQL Server Express to turn a simple normalized dataset into a pivoted dataset. This is not a beginner video as I assume you are familiar with basic SQL concepts.

T-SQL is Microsoft’s SQL language that contains additional functions and capabilities over and above ANSI standards. We’ll use some of these functions to turn the following data set that displays average rents in major American cities into a pivoted denormalized dataset.

The City values in the City column will become individual columns in a new pivoted dataset with their respective Average Rent values appearing underneath.

We’re going to transform this:

Normalized Data

Into this:

Pivoted Data

Notice how the city values are now column heads and the respective Average Rent values are underneath.

Make sure you watch the video but here is the code used in the example.

IF OBJECT_ID('tempdb..##TBL_TEMP') IS NOT NULL
DROP TABLE ##TBL_TEMP

--This parameter will hold the dynamically created SQL script
DECLARE   @SQLQuery AS NVARCHAR(MAX)

--This parameter will hold the Pivoted Column values
DECLARE   @PivotColumns AS NVARCHAR(MAX)

SELECT   @PivotColumns= COALESCE(@PivotColumns + ',','') + QUOTENAME([City])
FROM [dbo].[tbl_Rent]

/* UNCOMMENT TO SEE THE NEW COLUMN NAMES THAT WILL BE CREATED */
--SELECT   @PivotColumns

--Create the dynamic query with all the values for
--pivot column at runtime
--LIST ALL FILEDS EXCEPT PIVOT COLUMN

SET   @SQLQuery =
   N'SELECT [City Code],[Metro],[County],[State],[Population Rank],' +   @PivotColumns + '
   INTO ##TBL_TEMP
   FROM [dbo].[tbl_Rent]
   
   PIVOT( MAX([Average Rent])
      FOR [City] IN (' + @PivotColumns + ')) AS Q'

/* UNCOMMENT TO SEE THE DYNAMICALLY CREATED SQL STATEMENT */
--SELECT   @SQLQuery
--Execute dynamic query
EXEC sp_executesql @SQLQuery

/* VIEW PIVOTED TABLE RESULTS */
Select * from ##TBL_TEMP


Big shoutout to StackOverflow for help with this example.


Return Unmatched Records with SQL and Microsoft Access

Over the course of many years of building SQL scripts, I’ve tended to help SQL novices perform the set difference operation on their data. This post will not provide in-depth coverage on SQL run plans and tuning minutiae, but I do want to provide a high level overview for the novice.

If we define set A as the three numbers {1, 2, 3} and set B as the numbers {2, 3, 4} then the set difference, denoted as A \ B, is {1}. Notice that the element 1 is only a member of set A.

A picture is worth a thousand words as they say. A Venn diagram will be effective at illustrating what we’re trying to accomplish in this post.

Venn Diagram Difference

This blog post will cover using SQL and Microsoft Access to address capturing the shaded records in set A. If you have a database table named A and wanted to determine all of the rows in this table that DO NOT reside in another table named B, then you would apply the set difference principle.

LEFT OUTER JOIN & IS NULL SYNTAX

There are multiple ways to implement the set difference principle. It helps if there is a common join key between both sets of data when performing this analysis.

If I were working with two tables, one containing inventory data and one containing order data. I could write the following SQL script to return all the inventory rows that do not reside in the orders table.

SELECT table_inventories.* 
 FROM   table_inventories 
        LEFT OUTER JOIN table_orders 
                     ON table_inventories.id = table_orders.id 
 WHERE  table_orders.id IS NULL  

MICROSOFT ACCESS EXAMPLE

Consider the following tables in Microsoft Access. Observe that table_orders has fewer records than table_inventories.

Access Example Inventory Access Example Orders

We can construct a set difference select query using these tables to return all of the products in table_inventories that have not been ordered. Create a query in Microsoft Access in a similar fashion as shown below.

Access SQL Difference Join

The result of this query would produce the following two products that are not in table_orders.

Access Example Query Result

The Microsoft Access Query & View Designer would automatically generate the following SQL if you cared to open the Access SQL editor.

SELECT table_inventories.*
FROM   table_inventories
LEFT JOIN table_orders
ON table_inventories.id = table_orders.id
WHERE  (( ( table_orders.id ) IS NULL ));

Notice that LEFT JOIN is automatically created instead of LEFT OUTER JOIN. In Microsoft Access, the OUTER operation is optional. Also notice that Access loves to add additional parentheses for reasons known only to Microsoft.

Per Microsoft Access SQL Reference:

“Use a LEFT JOIN operation to create a left outer join. Left outer joins include all of the records from the first (left) of two tables, even if there are no matching values for records in the second (right) table [1].”

NOT EXISTS SYNTAX

Let’s step away from Microsoft Access for the remainder of this post. The NOT EXISTS approach provides similar functionality in a more performance friendly manner as compared to the LEFT OUTER JOIN & IS NULL syntax.

SELECT table_inventories.*
FROM   table_inventories
WHERE  table_inventories.id NOT EXISTS (SELECT table_orders.id
FROM   table_orders);

EXCEPT SYNTAX (T-SQL)

Alternatively, we could use the SQL EXCEPT operator which would also accomplish the task of returning inventory ids that do not reside in the orders table (i.e. inventory items that were never ordered). This syntax would be appropriate when using SQL Server.

SELECT table_inventories.id
FROM   table_inventories
EXCEPT
SELECT table_orders.id
FROM   table_orders

Per Microsoft:

“EXCEPT
Returns any distinct values from the query to the left of the EXCEPT operator that are not also returned from the right query [2].”

MINUS SYNTAX (ORACLE)

The following script will yield the same result as the T-SQL syntax. When using Oracle, make sure to incorporate the MINUS operator.

SELECT table_inventories.id
FROM   inventories
MINUS
SELECT table_orders.id
FROM   table_orders

Now take this tip and get out there and do some good things with your data.

Anthony Smoak

References:

[1] Access 2007 Developer Reference. https://msdn.microsoft.com/en-us/library/bb208894(v=office.12).aspx

[2] Microsoft T-SQL Docs. Set Operators – EXCEPT and INTERSECT (Transact-SQL). https://docs.microsoft.com/en-us/sql/t-sql/language-elements/set-operators-except-and-intersect-transact-sql

[3] Oracle Help Center. The UNION [ALL], INTERSECT, MINUS Operators. http://docs.oracle.com/cd/B19306_01/server.102/b14200/queries004.htm

Venn diagram courtesy of http://math.cmu.edu/~bkell/21110-2010s/sets.html