
I was recently teaching someone how to use the decomposition tree in Power BI and it clicked that this topic would make for a great video lesson. What I love about the decomposition tree is that it enables data analysts to conduct root cause analyses, identify patterns and discover insights that are not readily apparent. For example, if we want to understand the contributing factors to our small business profits based upon the data at hand, this visual fits the need to a tee.
Specifically, the decomposition tree lets you visualize data across multiple dimensions and enables drilling down into your dimensions in any order. As a bonus, it’s also an artificial intelligence (i.e., A.I.) visualization, so you can ask it to find the next dimension to drill down into based on certain criteria.

The picture below illustrates how our Smoaking Coffee Company Profits can be subdivided by dimensions across the top of the visual. Massachusetts apparently likes their coffee (Smoaking Coffee is hypothetically better than Dunkin’).

Absolute vs Relative AI Splits
Another benefit of the decomposition tree is the ability to choose between two types of AI splits: absolute and relative. AI splits are the automatic breakdowns that Power BI suggests based on your data.
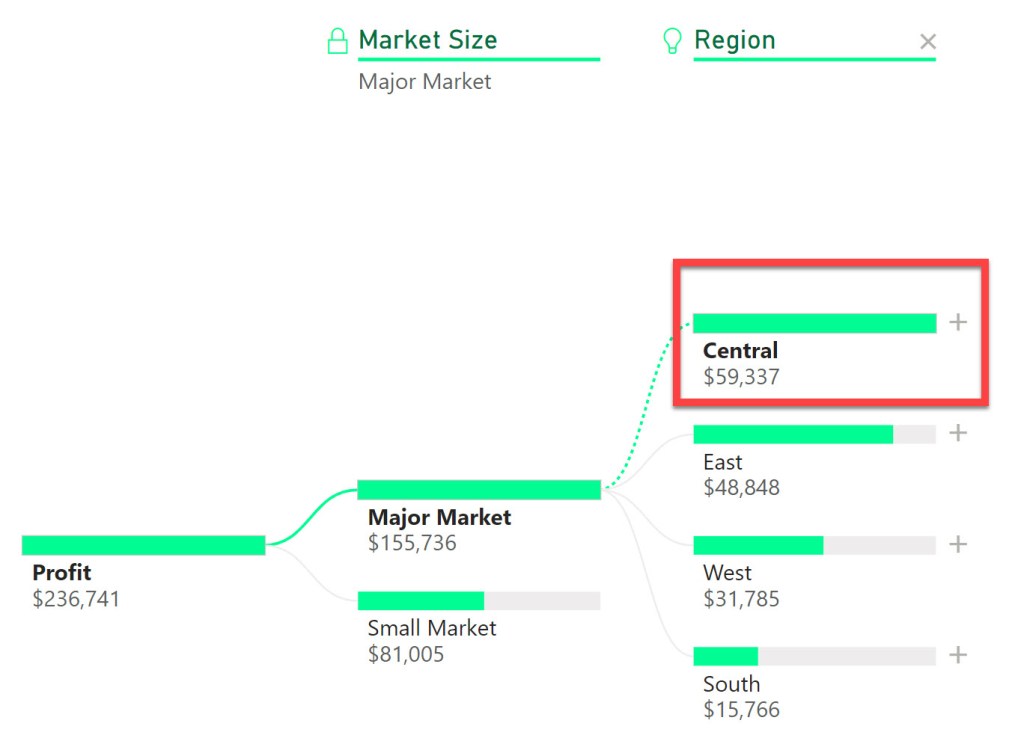
Absolute AI splits show you the highest or lowest contributors to the measure you are analyzing. In my example, if we are looking at profit by market size, the absolute AI split for high value will show us the market size that has the highest profit, in this case the Central region with $59,337 in profit.
Relative AI splits shows us the most interesting or unusual contributors to the measure we are analyzing. For example, if we switch the Analysis type to Relative from Absolute and perform the same analysis, the relative AI split will show us the product category that has the highest profit compared to its expected value based on the other categories. In this instance it is the Colombian coffee with $44,131 in profit. This number is lower than the absolute value of $59,337, but relative to it’s other product peers, it stands out.

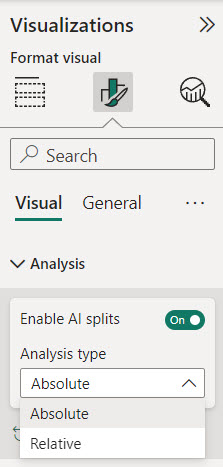
You can switch between absolute and relative AI splits by going to the format visual pane and selecting the analysis option. You can also choose whether you want to see the high or low values by clicking on the arrow next to the plus sign on the actual decomposition tree values.
Drill Through to Details
The decomposition tree is a great way to get a high-level overview of your data, but sometimes you may want to see the details behind the numbers. For example, if you are looking at profit by region, you may want to see the individual transactions that make up the profit for a specific region.
Power BI allows you to drill through to another page that shows the details of your data. To do this, you need to have a detail page that has the same measure as the one you are using in the decomposition tree. For example, if you are using profit as your measure, you need to have a detail page that has profit as well.
To drill through, you need to right-click on a node in the decomposition tree and select drill through to your detail page.

This will take you to the detail page and apply the filters based on the path you followed in the decomposition tree. For example, if you drilled through to the product value of Colombian, you will see the details of the profit transactions for products noted as Colombian.

This is a very useful feature that allows you to see the underlying data behind the summary. You can also use the back button to go back to the decomposition tree and explore other paths.
Use Bookmarks to Save and Share Your Analysis
Another cool feature of the decomposition tree is that it fully supports bookmarks. Bookmarks are a way to save and share your analysis with others. You can use bookmarks to capture the state of your report, including the filters, slicers, and visuals.
To create a bookmark, you need to go to the view tab and select bookmarks pane. Then, you need to click on the add button to create a new bookmark. You can give it a name and a description to make it easy to identify.
You can also link your bookmarks to buttons or images on your report. This way, you can create interactive scenarios that allow you to switch between different views of your data. For example, you can create a button that shows you the decomposition tree for the lowest state profit value and associated region.
To link a bookmark to a button or an image, you need to select the button or the image and go to the action option in the format shape pane. Then, you need to turn on the action and select bookmark as the type. You can then choose the bookmark that you want to link to the button or the image.

Using bookmarks, you can create dynamic and engaging reports that showcase your analysis and tell a story with your data.
Some Final Tips
Before I conclude, I want to share some final tips on how to use the decomposition tree in Power BI.
- You can rename your dimensions in the decomposition tree by selecting them in the Visualizations pane “Explain By” area. Simply right click on a value and select “Rename for this visual”. This can help you to customize the labels and make them more meaningful.
- You can lock the values in the decomposition tree by selecting the area to the left of the dimension name at the top of the decomposition tree visual (select the light bulb if the dimension was placed in the visual by AI). This will prevent the users from changing the nodes or the AI splits. This can be useful if you want to fix the analysis and avoid confusion.
- The maximum number of levels and data points that can be displayed in the decomposition tree are 50 levels and 5000 data points. I hope you never get to that point, however if you’re at that point, just start over; your visual is way too cluttered.
Conclusion
Watch the video to understand how you can use the decomposition tree in Power BI to analyze your data and conduct root cause analyses.
Yes I did get carried away with AI in the thumbnail picture for this video. I was always a fan of the John Stewart version of Green Lantern so I had to play around with AI to get a close approximation of me as a Lantern. May the decomposition tree work for you in brightest day and darkest night!!
I appreciate everyone who has supported this blog and my YouTube channel via merch. Please check out the logo shop here.
If you want to learn all the latest tips and tricks in core data analysis tools, stay in contact with me through my various social media presences.
And don’t forget to subscribe to my YouTube channel for more data analyst tips and tricks.
Join my YouTube channel to get access to perks:
https://www.youtube.com/channel/UCL2ls5uXExB4p6_aZF2rUyg/join
Anthony B Smoak
